
The Evolution of Online Identity: A Comprehensive Guide to All Authentication Mechanisms


Authentication is the process of verifying the identity of a user or device. It is a critical aspect of online security, and it ensures that only authorized individuals can access sensitive information or perform certain actions. Over the years, authentication mechanisms have evolved to become more sophisticated and secure.
In this article, we will take a comprehensive look at various types of authentication mechanisms, and how they have evolved over time to address the challenges faced by their predecessors.
Let's begin,
In the client-server architecture, the below diagram represents how the user's identity is verified.
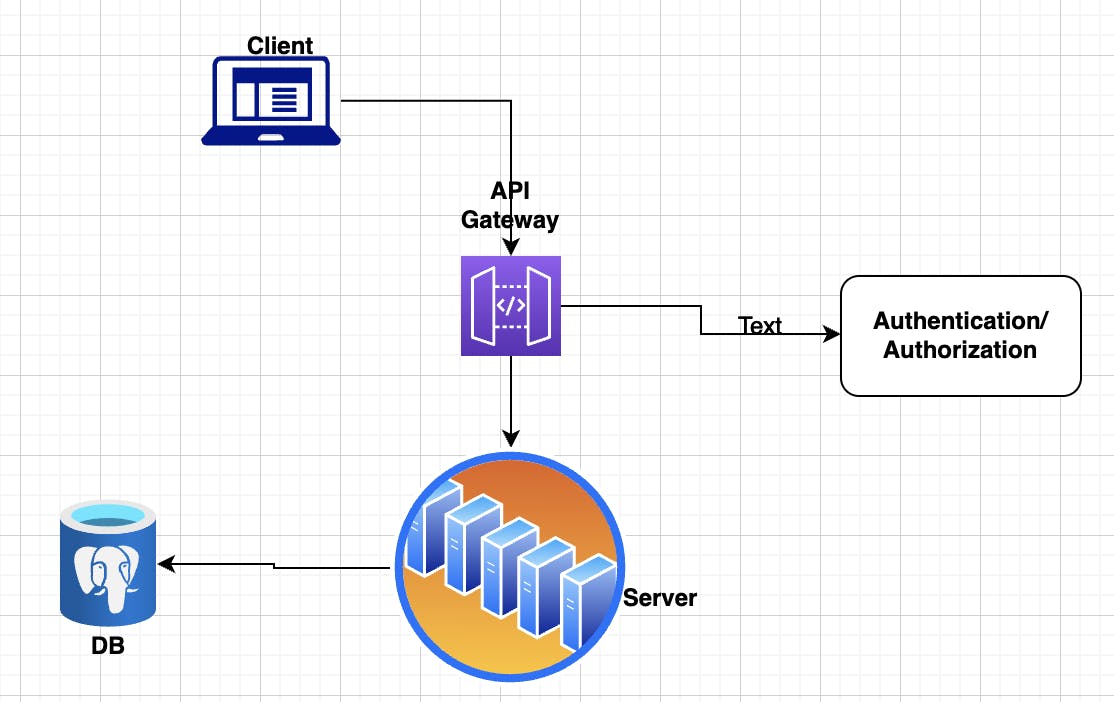
Here client sends a request to the server, which is generally an API gateway via HTTP/HTTPS Protocol. The server then verifies the user's identity to ensure that the request is coming from a genuine user. If the user is verified, the server serves the requested resource and if the user is not confirmed, the server raises an error response indicating that access is denied.
Authentication mechanisms can be broadly classified into two categories: password and passwordless. In each of these categories, there are different authentication mechanisms that have evolved over time. Let's first list them and then explore them one by one.
Basic Authentication
Session and Cookie Authentication
Token based Authentication
Single Sign-On - SSO Authentication
OpenID Connect (OIDC) and Oauth2.0
OTP
Basic Authentication
To understand the flow of basic authentication, let's draw a sequence diagram and list the steps involved.
Client                                   Server
  |                                          |
  | --------------- Request ---------------> |
  | GET /protected-resource                  |
  | Authorization: Basic base64(username:password)|
  |                                          |
  | <--------------- Response -------------- |
  | HTTP/1.1 200 OK                           |
  | Content-Type: text/plain                  |
  |                                          |
  |        [Protected resource content]      |
  |                                          |
The user enters a username and password.
The client generates a base64 encoded header with the username and password.
The client sends the
Authorization: Basic base64(username: password)header along with the request to access a protected resource on the server.The server decodes this encoded credential and then validates the user and password.
If the credentials match, the server responds with a successful 200 OK status code.
If the credentials do not match, the server responds with a 401 Unauthorized status code.
Limitation of Basic Auth:
As you see, this uses a base64 encoding mechanism which can be decoded easily.
The username and password in this need to be sent in every request as the server can not track the user's login status.
Logout functionality is not supported
This authentication mechanism is no longer considered secure and is not recommended for use in modern web applications. This brings to our next auth mechanism in this series.
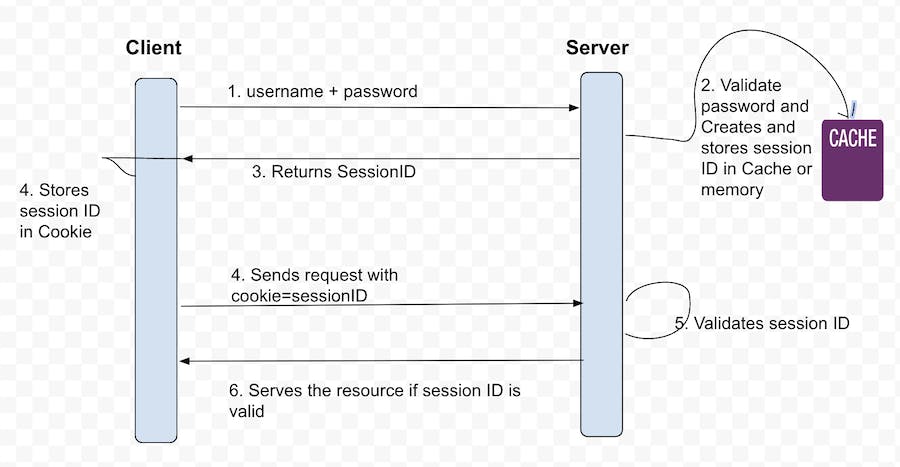
Session-Cookie Authentication
In this authentication process when a user logs in to a web application by entering their credentials. The server creates a session for the user and generates a unique session ID. This session ID is returned to the client and then the client/browser stores this id as a cookie on the user's browser. For the subsequent request client server uses this cookie to validate the user.
The flow is explained in the below diagram.
Challenges/Limitation
One of the primary challenges with session-based authentication is the need to store user session information in the server's memory or cache. While this approach is effective for monolithic applications, it presents a challenge in modern web frameworks where multiple servers are present behind a load balancer. Since requests can go to any server, all servers must be aware of the user's session and to solve this people uses sticky sessions in the load balancer So that request is always routed to the expected server. Another approach is to use the shared storage or cache. However, all these solutions are not the most efficient and involve overhead just to validate the user.
Cookies are also prone to XSS and CSRF attacks.
The challenges in session based auth bring us to the next authentication mechanism called Token based auth.
Token Based Authentication
Token-based authentication is a very popular and widely used authentication mechanism by modern web applications. In this
User logs in with their credentials: The user provides their username and password to the server first time
Token generation: After verifying the user's credentials, the server generates a token.
The token is then signed by a private key stored on the server and returned to the client
The client stores this token in its local storage
The subsequent request from the client sends this token in the request Authorisation header as
{"Authorization": "Bearer <Token>"}The server, when receives a request, validates the token information with the private key it signed while providing it to the client in step 3. This is done to restrict requests with malicious tokens.
If the token is validated successfully, the server returns the requested resource.

Let's understand more about tokens.
JSON Web Token(JWT) is a format of token-based authentication.
It contains three parts separated by a dot(.)
Header
The header contains information about the type of token and the signing algorithm used to generate the signature. The header is a JSON object that is base64 encoded.
Example:
{
  "alg": "HS256",
  "typ": "JWT"
}
Payload
The payload contains the claims, which are statements about an entity (typically, the user) generation time, expiration time, issuer, etc. The JWT token is generally recommended to have time to live after which it is considered expired. This payload is also base64 encoded
Example:
{
  "iss": ""
  "sub": "abc",
  "name": "Satish Mishra",
  "iat": 1681459268,
  "exp": 1681459268,
}
Signature
The encoded headers and encoded payload are signed by using the signature algorithm defined in the header. the signature is used to verify that the issuer of this JWT is who it says it is and ensures that message was not changed along the way.
Example:
HMACSHA256(
  base64UrlEncode(header) + "." +
  base64UrlEncode(payload),
  secret_key)
Benefits
Stateless: Unlike session based auth, they do not necessarily need to store the information of generated tokens on the server. This reduces the load on the server and works well for the distributed system
Security: They use the private key to verify the authenticity of the token
works well for machine-to-machine authentication as well.
Single Sign On(SSO) based Authentication
Single Sign-On (SSO) is a mechanism that allows a user to use one set of login credentials ( username and password) to access multiple applications. This means that users don’t need to remember different login details for each application they use, which saves time and reduces the risk of forgotten passwords.
SSO works by using a central authentication server(CAS) that handles user authentication and provides a token(JSON or XML) to access the applications.
This CAS is also called an identity provider(IDP). The applications that integrate the SSO are called a service provider(SP). It allows users to access multiple applications or services with a single set of login credentials. The method is also called Federated identity - Sharing of identity information across the different systems in a trusted group.
SSO Protocols:
There are two common protocols of SSO
SAML (Security Assertion Markup Language): It is a commonly used XML-based identity exchange protocol between systems/services.
OpenID Connect (OIDC): It uses a JWT token to share identity information between services. Google uses OIDC to authenticate into its applications - Gmail, Youtube, Drive, etc.
The SAMl Based Authentication Sequence is as follows.
The user through their browser access the service provider's web application, which uses a SAML-based identity provider for authentication.
The application server(SP) responds with a SAML request.
The browser parses the SAML request to redirect to the identity provider.
The identity provider parses the SAML request.
The identity provider authenticates the user by prompting for a username and password NOTE: The identity provider will skip this step if the user is already authenticated.
The identity provider generates the cryptographically signed SAML(XML Document) response and returns it to the browser.
The browser sends the generated SAML response to the service provider's application server which verifies it. Generally, this verification happens via public-private key pair.
If the verification succeeds, the SP grants the user access.
OIDC (OpenID Connect):
It is similar in concept to SAML (Security Assertion Markup Language), but the key difference is in the format of the tokens they use. While SAML is based on XML, OIDC utilizes JSON Web Tokens (JWT). Google and Facebook are a few popular IDPs that works on OIDC Protocol. More about this in the next section.
OpenID Connect (OIDC) and Oauth2.0
Let's first understand Oauth - Open Authorization with a use case.
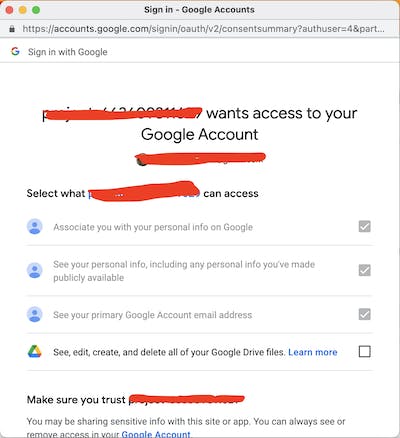
Suppose you are developing a service that allows users to import photos from their Google Drive. To do so, you would need to establish a connection with the user's Google Drive account and authenticate the Google Drive service to retrieve the photos. How would you do that? One way is you will ask the user to provide their user id and password for the Google account. But would users give their Google account credentials? No.. right? Because it will give you access to their complete Google accounts in place of giving access to certain photos. So what is the solution?
This is where Oauth comes in. Which allows services to access other services in a limited/Controlled way on behalf of users. The current Oauth version is 2.0. Oauth in general is an authorization mechanism. You would have seen examples where you allow access to for example google resources such as Name, DOB, and other personal information to a third-party website. In this case, google works as an authorization server and asks users if they want to allow access to the requested resource on the website. This is also called delegated authority.
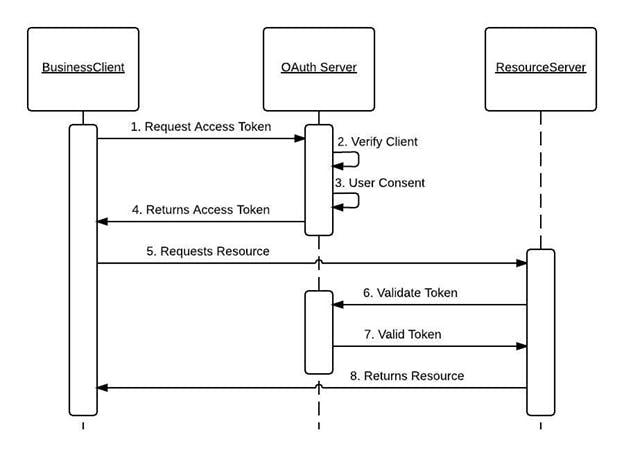
The below diagram depicts the above OAuth flow. It has 4 component
- User(You) 2. Business Client(Any Web app that needs access) 3. Oauth Server(Google) 4. ResourceServer(Google drive)
Back to the authentication part, the OIDC is a standard added on top of Oauth2.0. With oauth2.0 it can be used for user authentication. Let's understand it with an example.
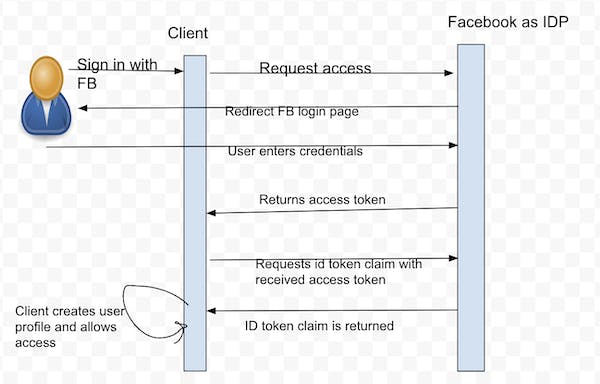
When a user opts to "Sign in with Facebook," they are redirected to the Facebook authentication server with additional scope for an OpenID profile(user profile data). Once the user enters their Facebook credentials, the Facebook authentication server returns a short-lived access token to the client. The client then uses this access token to make a request to the authentication server, which in turn returns the ID token with claims about the user's data such as name, email, etc.
Upon receiving the user's information from Facebook, the client app automatically creates an account for the user in its system and allows authentication. This streamlined authentication process eliminates the need for users to create separate accounts for each third-party application they use, thereby simplifying the login process and enhancing user experience.
One-Time Passwords (OTP)
In addition to another primary authentication method, this mechanism is also used in multi-factor authentication
Login with cell number
OTP is generated from the server with TTL and sent via SMS or Email
User enters OTP
The server validates and allows login
That's all about it. I hope this overview of authentication mechanisms and their evolution over time has been helpful to you.